The NetBeans IDE is an integrated development environment for software developers. It provides the tools you need to create professional desktop, enterprise, web, and mobile applications with the Java language, as well as PHP, JavaScript, Groovy and Grails, and C/C++.
NetBeans IDE 7.0 introduces language support for development to the proposed Java SE 7 specification with the JDK 7 developer preview. The release also provides enhanced integration with the Oracle WebLogic server, as well as support for Oracle Database and GlassFish 3.1. Additional highlights include Maven 3 and HTML5 editing support; a new GridBagLayout designer for improved Swing GUI development; enhancements to the Java editor, and more.
- http://netbeans.org/
Java ME-er
Thursday, April 21, 2011
Monday, September 6, 2010
Light Weight User Interface Toolkit 1.4 is now available
August 2010
Light Weight User Interface Toolkit 1.4 is now available
both in source and binary form. With the new XHTML component - rendering dynamic web content and embedding rich text locally in the Java ME applications will be easier than ever before.» Key features in the new release
Light Weight User Interface Toolkit 1.4 is now available
both in source and binary form. With the new XHTML component - rendering dynamic web content and embedding rich text locally in the Java ME applications will be easier than ever before.
Friday, July 16, 2010
LWUIT: TabbedPane

import javax.microedition.midlet.*;
import com.sun.lwuit.*;
import com.sun.lwuit.events.*;
import com.sun.lwuit.layouts.BorderLayout;
import com.sun.lwuit.layouts.BoxLayout;

public class LwuitTabbedPane extends MIDlet implements ActionListener {
    public void startApp() {
        Display.init(this);
        Form f = new Form("Lwuit TabbedPane");
        f.setLayout(new BorderLayout());
        Command exitCommand = new Command("Exit");
        f.addCommand(exitCommand);
        f.setCommandListener(this);

        f.setTitle("Lwuit TabbedPane");

        TabbedPane tp = new TabbedPane();

        tp.addTab("Tab 1", new Label("LWUIT: TabbedPane"));

        Container tabPanel = new Container(new BoxLayout(BoxLayout.Y_AXIS));

        RadioButton radioButton1 = new RadioButton("Radio Button 1");
        RadioButton radioButton2 = new RadioButton("Radio Button 2");
        RadioButton radioButton3 = new RadioButton("Radio Button 3");
        ButtonGroup buttonGroup1 = new ButtonGroup();
        buttonGroup1.add(radioButton1);
        buttonGroup1.add(radioButton2);
        buttonGroup1.add(radioButton3);
        tabPanel.addComponent(radioButton1);
        tabPanel.addComponent(radioButton2);
        tabPanel.addComponent(radioButton3);

        RadioButton radioButtonA = new RadioButton("Radio Button A");
        RadioButton radioButtonB = new RadioButton("Radio Button B");
        ButtonGroup buttonGroup2 = new ButtonGroup();
        buttonGroup2.add(radioButtonA);
        buttonGroup2.add(radioButtonB);
        tabPanel.addComponent(radioButtonA);
        tabPanel.addComponent(radioButtonB);

        tp.addTab("Tab 2", tabPanel);

        f.addComponent(BorderLayout.CENTER, tp);
        f.show();

    }

    public void pauseApp() {}
    public void destroyApp(boolean unconditional) {}
    public void actionPerformed(ActionEvent ae) {
        notifyDestroyed();
    }
}
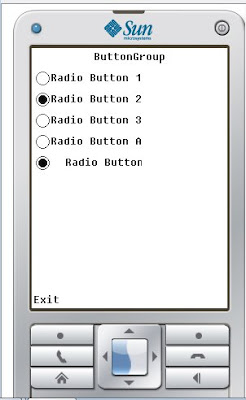
LWUIT: ButtonGroup
The ButtonGroup component manages the selected and unselected states for a set of
RadioButtons. For the group, the ButtonGroup instance guarantees that only one
button can be selected at a time.

RadioButtons. For the group, the ButtonGroup instance guarantees that only one
button can be selected at a time.

import javax.microedition.midlet.*;
import com.sun.lwuit.*;
import com.sun.lwuit.events.*;
import com.sun.lwuit.layouts.BorderLayout;

public class LwuitButtonGroup extends MIDlet implements ActionListener {
    public void startApp() {
        Display.init(this);
        Form f = new Form("Hello, MIDlet in LWUIT!");
        Command exitCommand = new Command("Exit");
        f.addCommand(exitCommand);
        f.setCommandListener(this);

        f.setTitle("ButtonGroup");

        RadioButton radioButton1 = new RadioButton("Radio Button 1");
        RadioButton radioButton2 = new RadioButton("Radio Button 2");
        RadioButton radioButton3 = new RadioButton("Radio Button 3");
        ButtonGroup buttonGroup1 = new ButtonGroup();
        buttonGroup1.add(radioButton1);
        buttonGroup1.add(radioButton2);
        buttonGroup1.add(radioButton3);
        f.addComponent(radioButton1);
        f.addComponent(radioButton2);
        f.addComponent(radioButton3);

        RadioButton radioButtonA = new RadioButton("Radio Button A");
        RadioButton radioButtonB = new RadioButton("Radio Button B");
        ButtonGroup buttonGroup2 = new ButtonGroup();
        buttonGroup2.add(radioButtonA);
        buttonGroup2.add(radioButtonB);
        f.addComponent(radioButtonA);
        f.addComponent(radioButtonB);

        f.show();

    }

    public void pauseApp() {}
    public void destroyApp(boolean unconditional) {}
    public void actionPerformed(ActionEvent ae) {
        notifyDestroyed();
    }
}
Monday, July 12, 2010
LWUIT: GridLayout
A GridLayout object places components in a grid of cells. Each component takes all
the available space within its cell, and each cell is exactly the same size.

the available space within its cell, and each cell is exactly the same size.

 GridLayout gridLayout = new GridLayout(3, 2);
        f.setLayout(gridLayout);
        f.setTitle("GridLayout");

        f.addComponent(new Button("Button 1"));
        f.addComponent(new Button("Button 2"));
        f.addComponent(new Button("Button 3"));
        f.addComponent(new Label("Label 1"));
        f.addComponent(new Button("Button 4"));
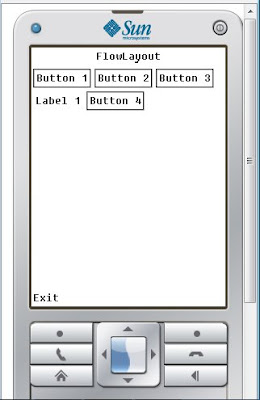
LWUIT: FlowLayout
The FlowLayout class provides a very simple layout manager that is the default
layout manager for Container objects.
The FlowLayout class puts components in a row, sized at their preferred size. If the
horizontal space in the container is too small to put all the components in one row,
the FlowLayout class uses multiple rows. To align the row to the left, right, or center,
use a FlowLayout constructor that takes an alignment argument.

        FlowLayout flowLayout = new FlowLayout();
        f.setLayout(flowLayout);
        f.setTitle("FlowLayout");

        f.addComponent(new Button("Button 1"));
        f.addComponent(new Button("Button 2"));
        f.addComponent(new Button("Button 3"));
        f.addComponent(new Label("Label 1"));
        f.addComponent(new Button("Button 4"));
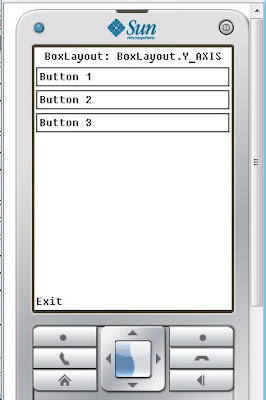
LWUIT: BoxLayout
The BoxLayout class puts components either on top of each other or in a row.


        BoxLayout boxLayout = new BoxLayout(BoxLayout.X_AXIS);
        f.setLayout(boxLayout);
        f.setTitle("BoxLayout: BoxLayout.X_AXIS");

        Button button1 = new Button("Button 1");
        Button button2 = new Button("Button 2");
        Button button3 = new Button("Button 3");
        f.addComponent(button1);
        f.addComponent(button2);
        f.addComponent(button3);

        BoxLayout boxLayout = new BoxLayout(BoxLayout.Y_AXIS);
        f.setLayout(boxLayout);
        f.setTitle("BoxLayout: BoxLayout.Y_AXIS");

        Button button1 = new Button("Button 1");
        Button button2 = new Button("Button 2");
        Button button3 = new Button("Button 3");
        f.addComponent(button1);
        f.addComponent(button2);
        f.addComponent(button3);
Subscribe to:
Comments (Atom)